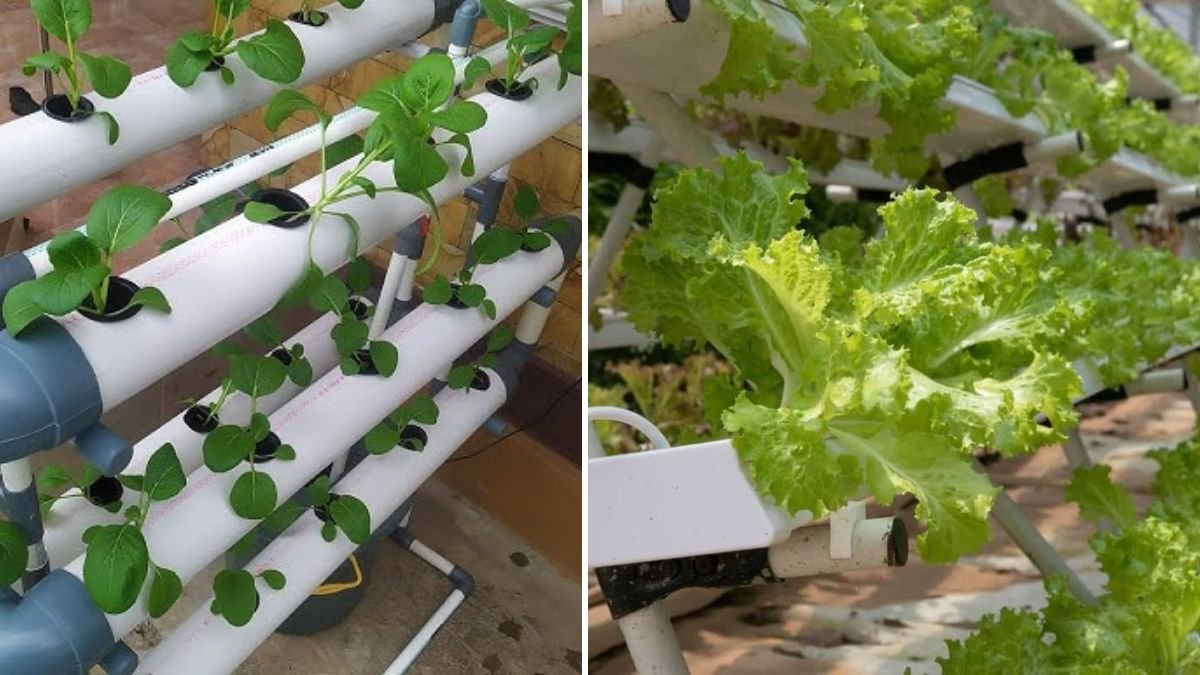
Growing fresh vegetables at home has never been easier—or more exciting—thanks to vertical hydroponics. Imagine producing leafy greens, herbs, and even fruiting vegetables without soil, without pots, and without needing a large garden. This ingenious method uses vertical space efficiently, reduces water waste, and helps plants grow faster and healthier.
In this article, you’ll learn how to build an easy vertical hydroponics system using affordable, accessible materials. Whether you live in a small apartment, have a tiny balcony, or want to boost productivity in your backyard, this beginner-friendly guide will help you succeed.
🌿 Why Vertical Hydroponics? The Magic Behind the Method

Traditional gardening relies heavily on soil, space, and consistent watering. Hydroponics—where plants grow in nutrient-rich water instead of soil—solves all these issues. Vertical hydroponics takes things even further, allowing you to grow more plants in less space.
Benefits of Vertical Hydroponics:
- No soil, no pots – Plants grow directly in moisture and nutrients.
- Space-efficient – Perfect for balconies, terraces, and urban homes.
- Water-saving – Systems recycle water, reducing usage by up to 90%.
- Fast growth – Plants get balanced nutrients, growing 30–50% faster.
- Clean and pest-resistant – No mud, fewer soil-borne diseases.
- High yield – Grow dozens of plants in a small vertical frame.
Hydroponics may look complex, but building your own system at home is surprisingly simple.
🛠 Materials Needed for a Simple DIY System
You don’t need expensive kits or high-tech devices. Here’s what you require:
Essential Materials
- PVC pipe (4-inch or 6-inch diameter)
- Hole saw or cutter (for plant openings)
- PVC end caps
- Water reservoir bucket
- Small submersible pump (15–25W)
- Flexible water tubing
- Net cups (optional)
- Coco peat or sponge cubes
- Nutrient solution (hydroponic liquid fertilizer)
- Vertical stand (wooden frame or metal rack)
Optional Add-ons
- Timer for automated watering
- Grow lights (for indoor gardeners)
- pH testing kit
With these materials, you can assemble a functional hydroponic tower in just a few hours.
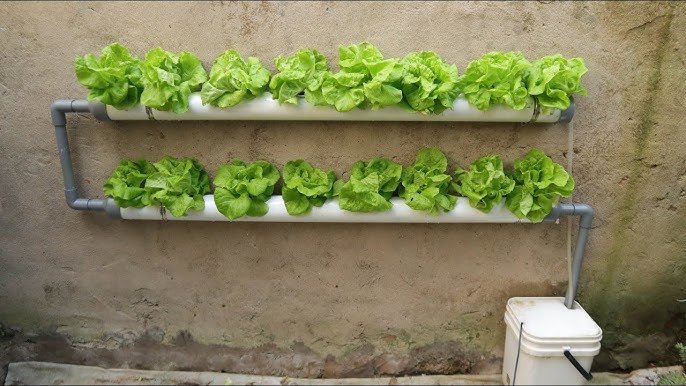
🔧 Step-by-Step: Build Your Vertical Hydroponic System
Let’s break it down into easy steps that anyone can follow.
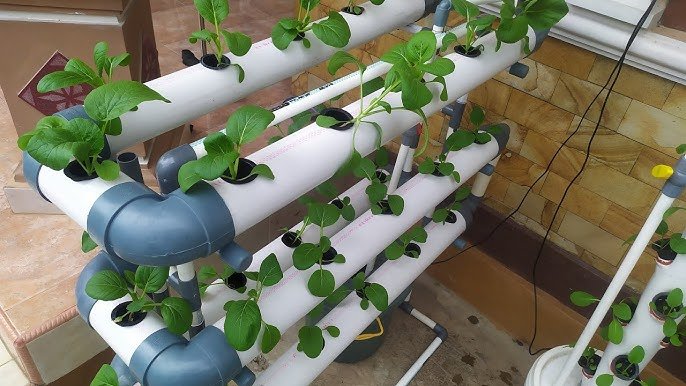
1. Prepare the PVC Pipes
Choose a long PVC pipe—around 4 to 6 feet works great.
- Using a hole saw, cut evenly spaced holes (2.5–3 inches wide) along the pipe.
- Keep at least 6–8 inches between each hole to give plants room to grow.
- Sand the edges to remove sharpness.
These holes are where your plant cups will sit.
2. Seal Pipe Ends
Attach PVC end caps to both ends.
- The bottom cap will help water pool and flow upward.
- The top cap prevents evaporation and keeps dust out.
You can glue them for strength or secure with waterproof tape.
3. Set Up the Water Reservoir
Place a sturdy bucket or tub at the base.
- This will hold the nutrient-rich water.
- The pump sits inside and sends water up through tubing into the pipe.
Make sure the reservoir is shaded to prevent algae growth.
4. Install the Pump and Tubing
- Connect a small water pump to a flexible hose.
- Guide the hose up the inside (or outside) of the PVC pipe.
- Create a drip outlet at the top, letting water trickle downward through the system.
This creates a nutrient waterfall that feeds every plant.
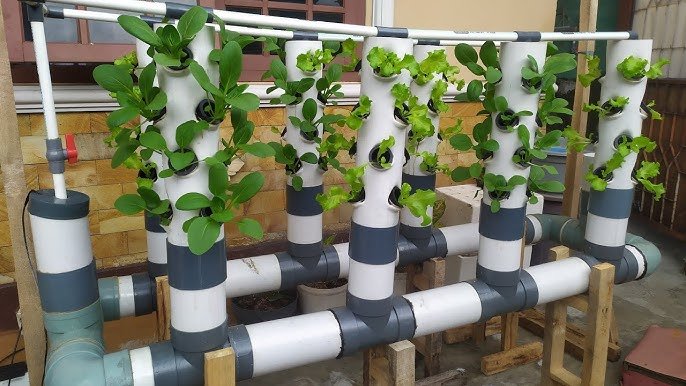
5. Build a Vertical Stand
Use a wooden frame, metal rack, or wall mount.
Ensure:
- Proper support for the pipe’s weight
- Stability during wind or movement
- Easy access for maintenance
Place the pipe vertically and secure it firmly.
6. Add Growing Medium and Net Cups
Net cups keep your plants anchored while roots hang freely.
If you don’t have net cups:
- Cut small plastic cups
- Use kitchen strainers
- Or even place sponge cubes directly in the holes
Fill cups with:
- Coco peat
- Rockwool
- Peat moss
- Coconut husk chips
Avoid soil—hydroponics doesn’t need it.
7. Prepare and Add Nutrient Solution
Hydroponic nutrients are vital for growth.
- Mix according to label instructions.
- Maintain pH between 5.8–6.5.
- Fill the reservoir.
Turn on the pump and watch the water flow!
🌱 What Can You Grow in This System?
Vertical hydroponics is incredibly versatile.
Best Vegetables for Beginners:
- Lettuce
- Spinach
- Kale
- Basil
- Mint
- Cilantro
- Pak choi
- Mustard greens
- Chards
For intermediate growers:
- Strawberries
- Cherry tomatoes
- Cucumbers
- Chillies
These plants thrive when roots have constant access to nutrients.
🌞 Care and Maintenance Tips
1. Light Requirements
Plants need 4–6 hours of direct sunlight.
Indoor gardeners can use LED grow lights.
2. Nutrient Management
- Check nutrient levels weekly.
- Change solution every 10–14 days.
- Monitor pH regularly to avoid deficiencies.
3. Pump Schedule
You may run the pump:
- 15 minutes ON
- 45 minutes OFF
Or adjust based on plant needs.
4. Cleanliness
Every month, clean the tube with warm water and mild soap to prevent algae buildup.
🌾 Results: Faster Growth and Higher Yields
With this simple system, plants typically:
- Grow faster
- Develop stronger root systems
- Produce fresher, greener, and tastier leaves
- Require less water and care
A single vertical hydroponic tower can grow 20–30 plants in the footprint of a tiny bucket!
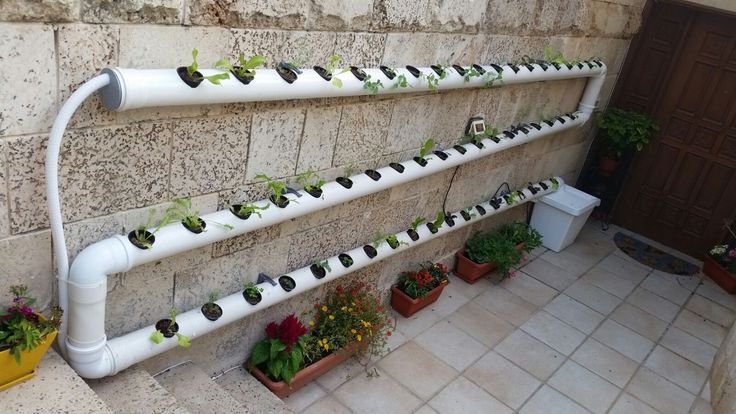
🏡 Perfect for Urban Gardeners and Small Families
This system fits:
- Balconies
- Rooftops
- Terraces
- Patio corners
- Indoor areas near a window
It’s neat, clean, and visually appealing.
Imagine having a beautiful green tower filled with fresh leafy vegetables growing right in your home—without ever touching soil.
🌟 Final Thoughts: Anyone Can Build This System
Vertical hydroponics combines science and simplicity. It’s not just a gardening technique—it’s a lifestyle upgrade that saves money, saves space, and produces nutritious food all year round.
You don’t need prior experience, expensive tools, or a big garden.
Just a PVC pipe, a small pump, and a desire to grow your own food.
Try building your own vertical hydroponic system and watch how quickly you’ll harvest fresh vegetables—right at home.